Advanced uses of Tags
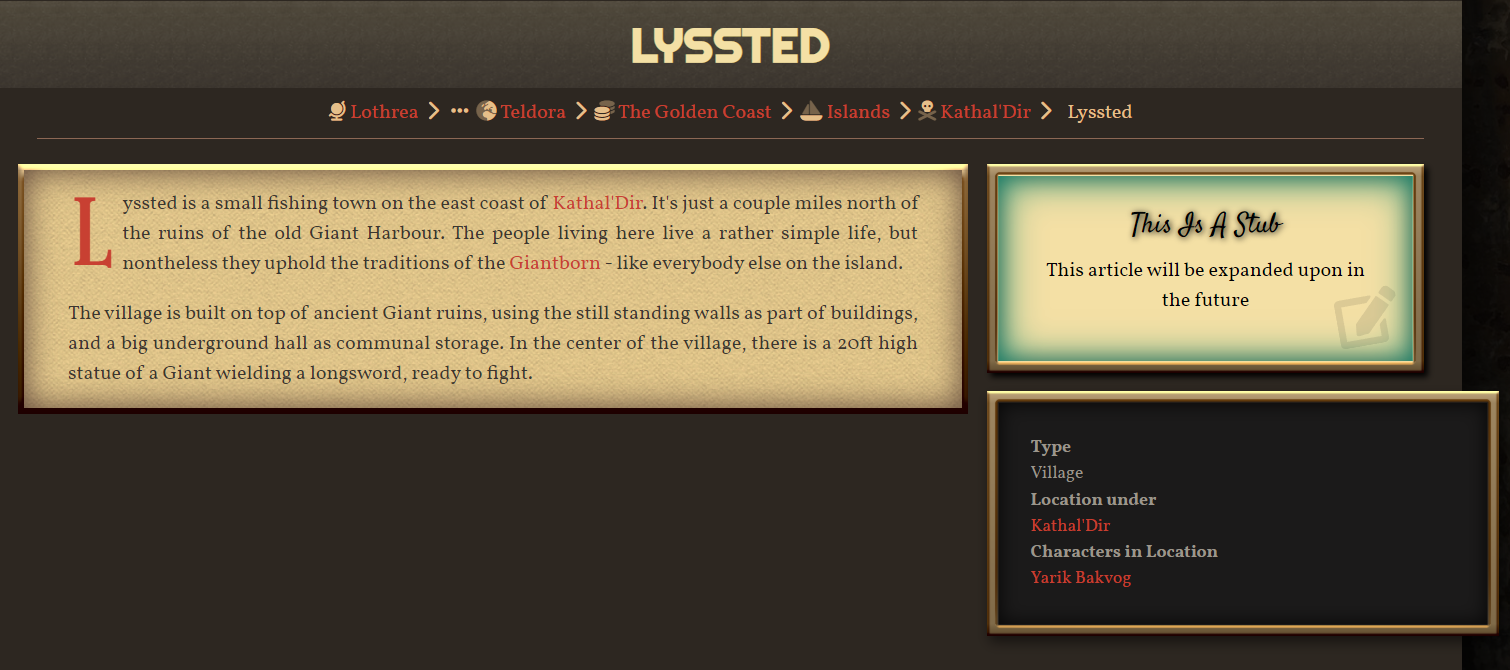
This is a stub
This article will be expanded upon in the future
Basics
- categoriese your articles in addition to categories
- mark your articles to be included by various features of WA (diplomancy webs, tagged lists...)
Tag based Content

- Automatically show a "This is a stub" or "This article is still under construction" message on your articles, just by tagging them "stub" or "wip"
- Automatically add trigger warnings, just by adding a tag, which you might be already using for categorisation anyways.
- You can add Global Content to every article in your world.
- You can show and hide specific content with css
- Every tag is added as a css class to your article
Step 1: Add your global content
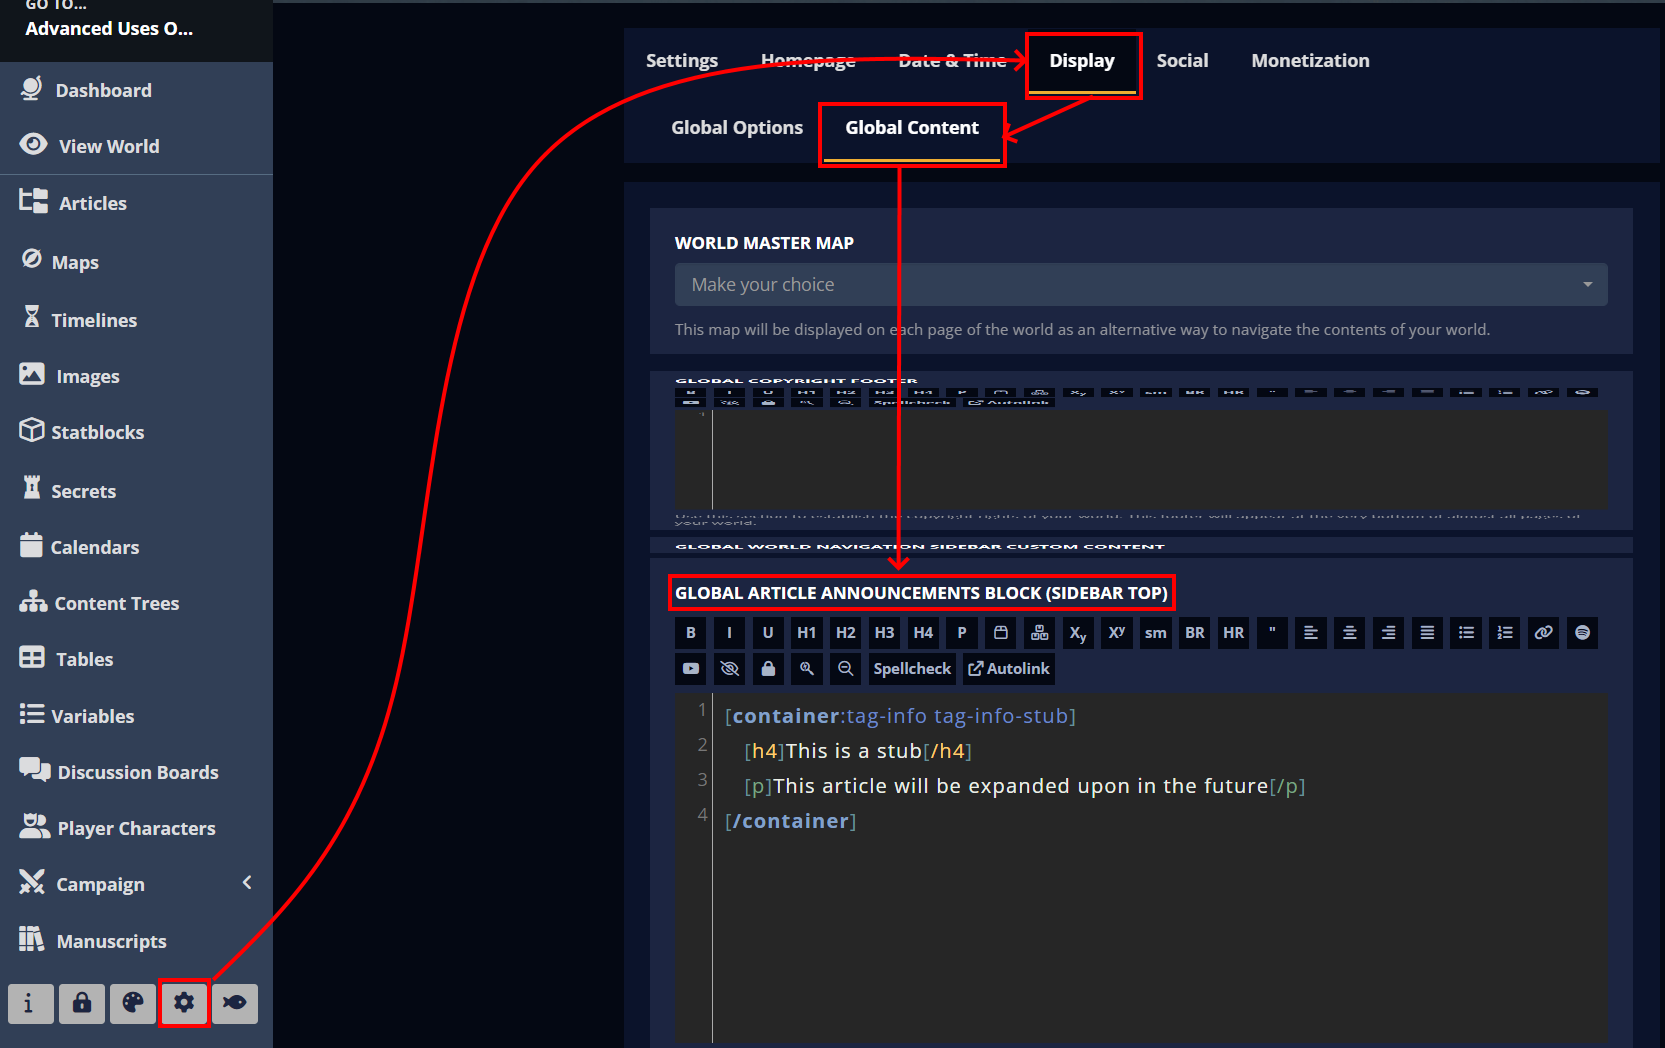
You can find various global fields in your world settings under Settings > Display > Global Content, which show up on every article in your world. For this we will be using the GLOBAL ARTICLE ANNOUNCEMENTS BLOCK (SIDEBAR TOP) field, so scroll down a bit until you find it. In here define a container for every tag you want to use. All these containers need one general css class tag-info and one specific to the tag you want to use tag-info-<customtag>.[container:tag-info tag-info-stub] <Your Content> [/container]
Step 2: Add the CSS
.user-css .world-global-annnouncement .tag-info{
display: none !important;
}
.user-css.tag-stub .world-global-annnouncement .tag-info-stub{
display: block !important;
}
The Css uses two pieces. First we will have to hide all tag based content containers, so they don't show up when we don't need them.
Then we will add a seperate block for each tag based content container we want to use. Replace the bold parts with your own tag if you want to use different ones.
Index / Glossary
Simple Glossary
The idea behind this is actually pretty simple. Tagged lists can pull all articles with a specific tag, and will list them in alphabetical order. To format our Glossary a bit better, we will use one tag per starting letter. So in the end we will tag every article starting with an 'A' with the tag 'idx-a', every article starting with a 'B' with 'idx-b' and so on.Step 1: Copy the Glossary BBCode into a new generic article in your world
Hint: The world anvil search includes tags. Usually this is a very useful feature, but for our use case this is counterproductive as we will have to tag every article in the world. To mitigate this, I recommend using tags you will not search after. This is the reason why I named all tags below 'idx-b' instead of 'index-b'[row] [col3][tagged:idx-a|list|A][/col3] [col3][tagged:idx-b|list|B][/col3] [col3][tagged:idx-c|list|C][/col3] [/row] [row] [col3][tagged:idx-d|list|D][/col3] [col3][tagged:idx-e|list|E][/col3] [col3][tagged:idx-f|list|F][/col3] [/row] [row] [col3][tagged:idx-g|list|G][/col3] [col3][tagged:idx-h|list|H][/col3] [col3][tagged:idx-i|list|I][/col3] [/row] [row] [col3][tagged:idx-j|list|J][/col3] [col3][tagged:idx-k|list|K][/col3] [col3][tagged:idx-l|list|L][/col3] [/row] [row] [col3][tagged:idx-m|list|M][/col3] [col3][tagged:idx-n|list|N][/col3] [col3][tagged:idx-o|list|O][/col3] [/row] [row] [col3][tagged:idx-p|list|P][/col3] [col3][tagged:idx-q|list|Q][/col3] [col3][tagged:idx-r|list|R][/col3] [/row] [row] [col3][tagged:idx-s|list|S][/col3] [col3][tagged:idx-t|list|T][/col3] [col3][tagged:idx-u|list|U][/col3] [/row] [row] [col3][tagged:idx-v|list|V][/col3] [col3][tagged:idx-w|list|W][/col3] [col3][tagged:idx-x|list|X][/col3] [/row] [row] [col3][tagged:idx-y|list|Y][/col3] [col3][tagged:idx-z|list|Z][/col3] [/row]
Step 2: Tag all your articles
Hint: If you want to have a more complex Glossary / Index system, skip this step for now and read the section below. Now you will have to go through all your articles and tag them accordingly. After you've done that, your Glossary page should now show every article.Complex Glossary
When your world grows bigger and bigger, a simple Glossary might not be enough to help your readers easily find your articles. Having articles sorted by types in addition to one big Glossary might be very useful for you. To understand how this works, you need to understand one fundamental thing about tagged lists. Tagged list do not just grab each article with a specific tag, but they do a "contains" check. For example, if you tag an article with #article #character, a list using either #article or #character will show this article. But it goes even further. If you tag an article with #index-character, both #index and #index-character will match. And this is what we'll be using to generate more complex glossaries.Step 1: Decide on which additional Glossaries you want to use
First you'll have to decide, which additional Glossaries you want to have. Maybe you want to have an extra glossary for your characters, or for every tavern in your world? Maybe a list of all settlements? Either way, make a list and note down an identifier you want to use for each glossary. In this example, I will create a Glossary for all characters in my world, using the short-form char as an identifier. As this glossary will include fewer links than the last one, I will use a slightly different layout.Step 2: Create the glossary
[row]
[col3]
[center][hr][h3]A-C[/h3][/center]
[tagged:idx-a-char|list|none]
[tagged:idx-b-char|list|none]
[tagged:idx-c-char|list|none]
[/col3]
[col3]
[center][hr][h3]D-F[/h3][/center]
[tagged:idx-d-char|list|none]
[tagged:idx-e-char|list|none]
[tagged:idx-f-char|list|none]
[/col3]
[col3]
[center][hr][h3]G-I[/h3][/center]
[tagged:idx-g-char|list|none]
[tagged:idx-h-char|list|none]
[tagged:idx-i-char|list|none]
[/col3]
[/row]
[row]
[col3]
[center][hr][h3]J-L[/h3][/center]
[tagged:idx-j-char|list|none]
[tagged:idx-k-char|list|none]
[tagged:idx-l-char|list|none]
[/col3]
[col3]
[center][hr][h3]M-O[/h3][/center]
[tagged:idx-m-char|list|none]
[tagged:idx-n-char|list|none]
[tagged:idx-o-char|list|none]
[/col3]
[col3]
[center][hr][h3]P-R[/h3][/center]
[tagged:idx-p-char|list|none]
[tagged:idx-q-char|list|none]
[tagged:idx-r-char|list|none]
[/col3]
[/row]
[row]
[col3]
[center][hr][h3]S-U[/h3][/center]
[tagged:idx-s-char|list|none]
[tagged:idx-t-char|list|none]
[tagged:idx-u-char|list|none]
[/col3]
[col3]
[center][hr][h3]V-W[/h3][/center]
[tagged:idx-v-char|list|none]
[tagged:idx-w-char|list|none]
[/col3]
[col3]
[center][hr][h3]X-Z[/h3][/center]
[tagged:idx-x-char|list|none]
[tagged:idx-y-char|list|none]
[tagged:idx-z-char|list|none]
[/col3]
[/row]
Step 3: Repeat for all glossaries you want to have
Now just repeat the process above for all the other glossaries you want to use. The amazing thing? Using tags in this way means by tagging an article with a single tag, it will show up in the correct place on your main glossary, and on the smaller glossaries as well. But you don't have to stop there! This is nearly endlessly nestable. You want to have a glossary for all buildings, and one for every tavern? That’s really simple! Just tag all your taverns with something like #idx-a-building-tavern and you can create a glossary just checking for the building part, and one that checks for the tavern!Step 4: Tag all your articles!
Now go ahead and tag all your articles, and watch them magically appear on your glossary pages!Bonus Step 5: Create automatic links back to your glossaries!
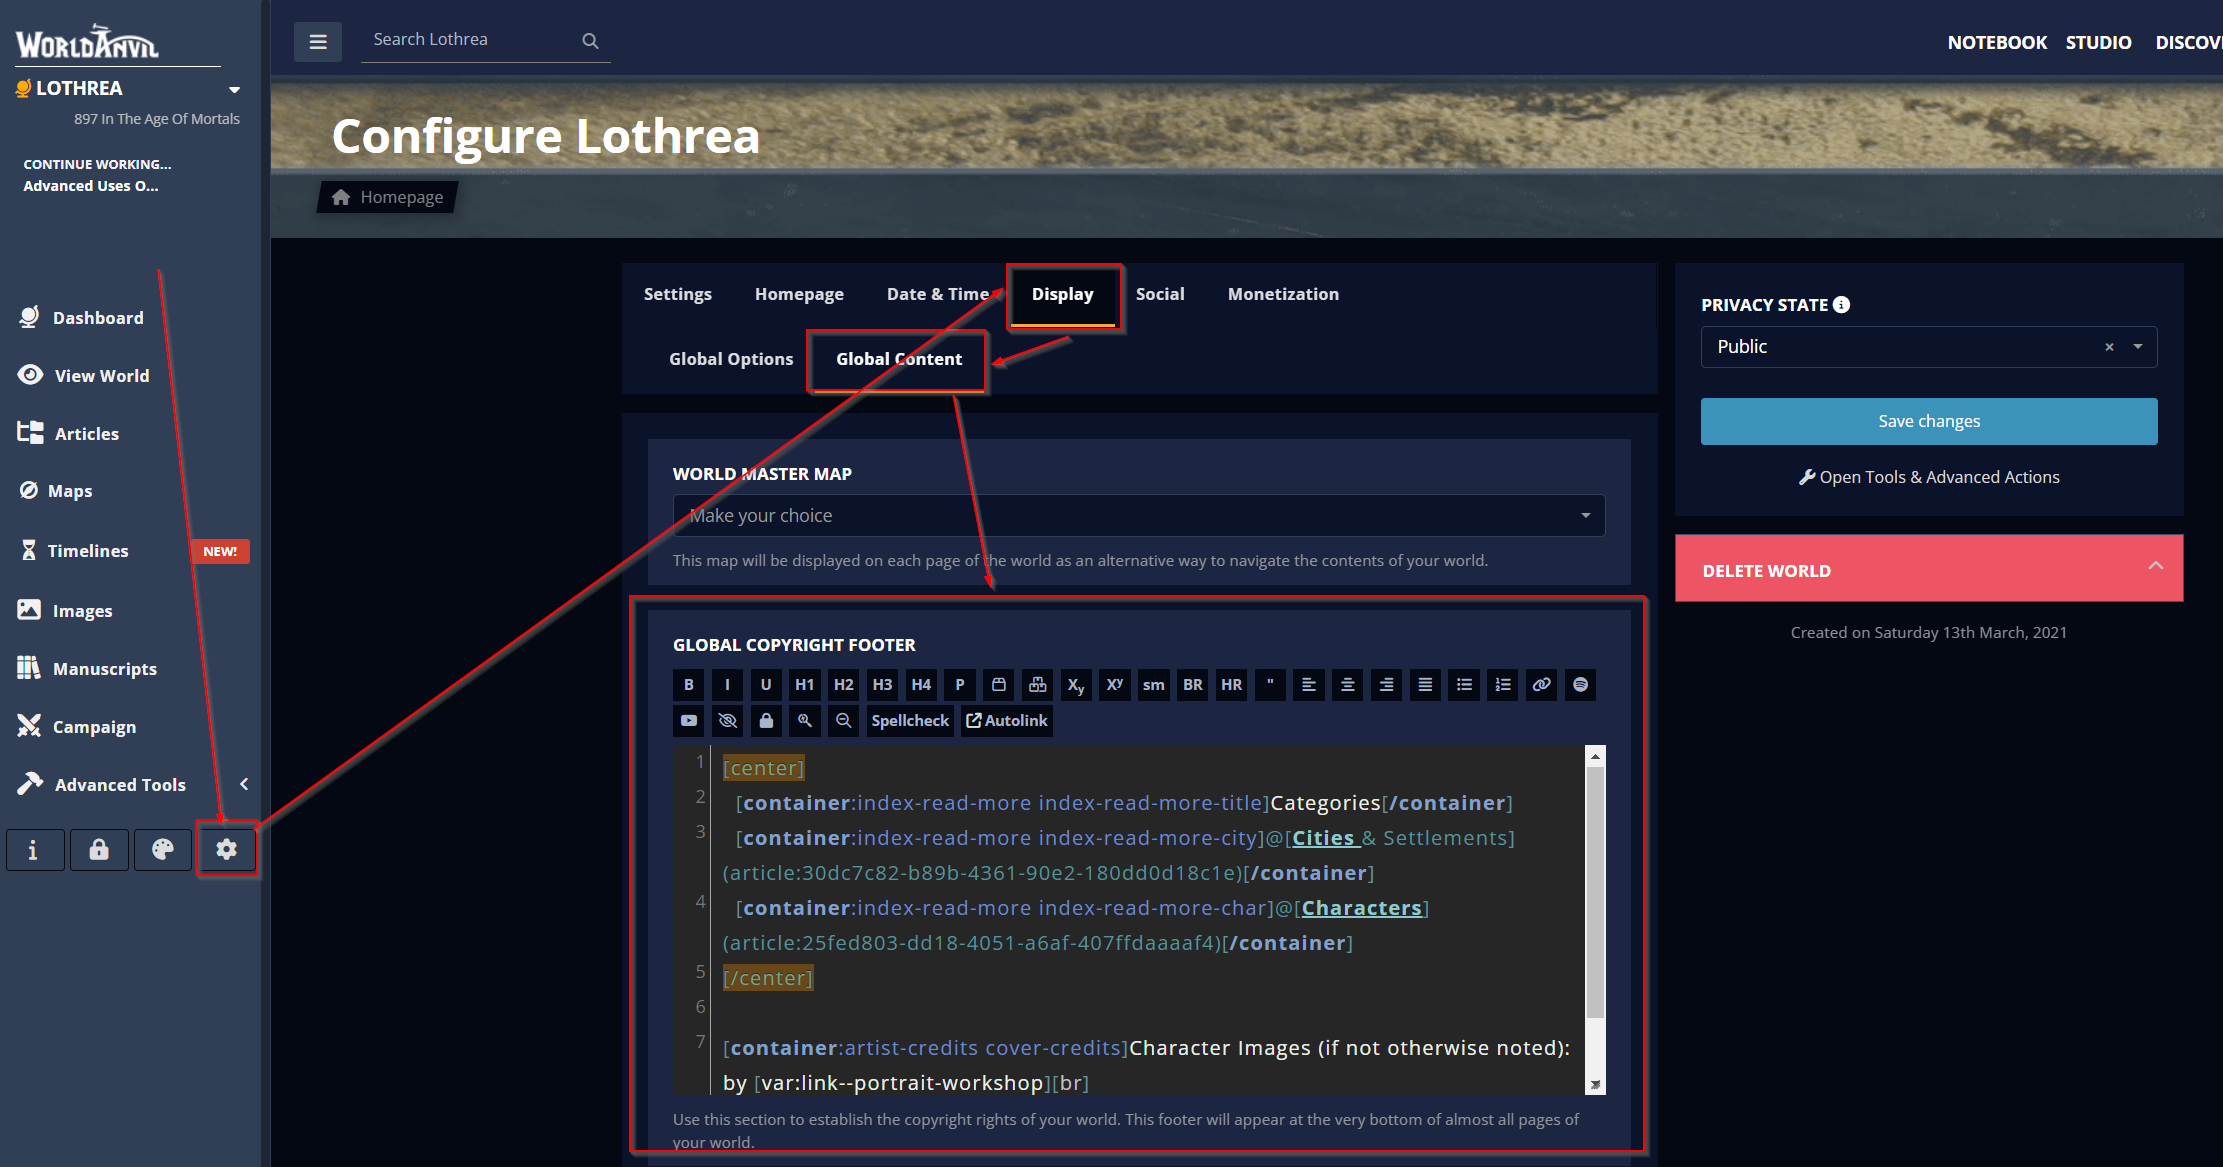
Combining Tag Based Content, and our new Glossary system, we can easily add automatic backlinks to every glossary to every article. So when you tag an article for a glossary, the link will just appear at the end of that article!Add your backlinks to your global content. You can once again find them under Settings > Display > Global Content. This time, we will use the GLOBAL COPYRIGHT FOOTER block. Repeat the second line for each index you created above.
[container:index-read-more index-read-more-title]Categories[/container]
[container:index-read-more index-read-more-char]@[Characters](article:25fed803-dd18-4051-a6af-407ffdaaaaf4)[/container]
.user-css.page .index-read-more{
display: none !important;
}

.user-css.page[class*=tag-idx][class*=-char] .index-read-more-title,
.user-css.page[class*=tag-idx][class*=-char] .index-read-more-char
{
display: inline-block !important;
}
The first block will remove every link by default. The second block then shows the correct link for each article. If you've created multiple glossaries, duplicate this block, replacing char with the key you've used.If you enjoy what I'm doing consider giving this a like, and let me know what you think about this article in the comments.


Thank you so much for this guide! I didn't realize how powerful tags could be until I saw how you used them.
Tags are really incredibly powerful! Glad I could help!